Posts

toner cartridge

Tips for Maintenance of Inkjet Printer Related Products

Summary: Due to the way of working, inkjet printer placed place must be horizontal, inclined to work not only affect the print effect, slow down nozzle working speed, and can damage the internal mechanical structure. do not put the printer on the ground, especially carpeted ground, it is easy to have foreign matter or dust flying into the machine


  1. Place the printer on a horizontal desktop
    Due to the way of working, inkjet printer placed place must be horizontal, inclined to work not only affect the print effect, slow down nozzle working speed, and can damage the internal mechanical structure. do not put the printer on the ground, especially carpeted ground, it is easy to have foreign matter or dust flying into the machine.
  2. Take good measures to prevent dust
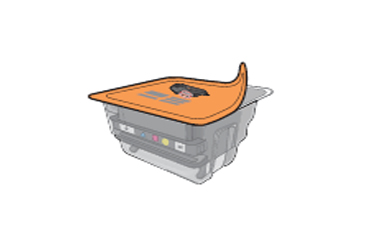
    When the printer is working, don’t open the front panel. there is nothing interesting when printing, just the nozzle is moving around, also to prevent the dust is blown into the machine.After printing and cooling for half an hour, cover the dust shield immediately and don’t keep the shield open in the room.
  3.  Turn off the machine before unplugging it
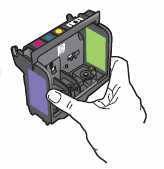
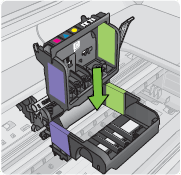
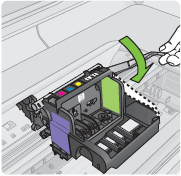
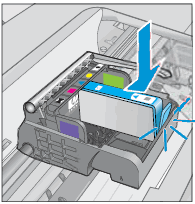
    Before using the printer or moving it, do a permanent power-off. turn off the printer power first (if any), reset the nozzle and cover the ink tank, and then unplug the power cord and signal cable. Prevents ink from evaporating and does not easily damage the nozzle when moving
  4. Install the toner cartridge carefullyThe support mechanism of toner cartridge only can bear little strength. be careful when installing the new toner cartridge. according to the normal design, the toner cartridge can be installed with proper strength, don’t push the support hard.
  5. Timely clean
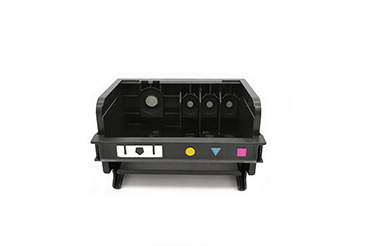
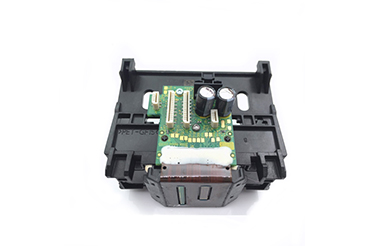
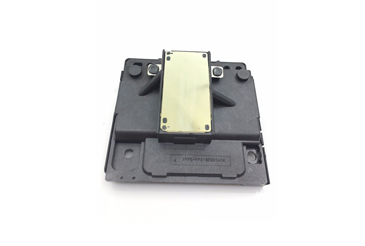
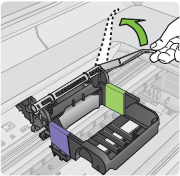
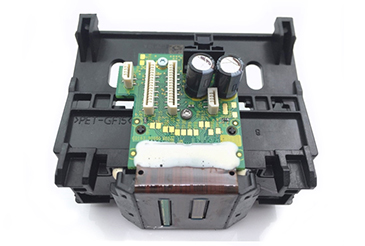
    The outside of the printer is the same as the inside. It should be cleaned regularly. don’t wait until it is full of thick dust and remedied it after with problem. The outside of the printer can be wiped with a wet soft cloth. The cleaning liquid must be a neutral substance such as water. Use dry cloth to wipe the interior as much as possible, and do not touch internal electronic components, machinery, etc.
  6. Printer internal structure
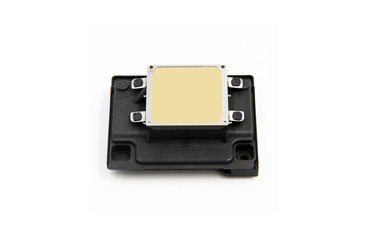
    The cleaning of the nozzle should not be done manually. The best way is to use a software-controlled printhead cleaning program. Especially after adding ink, be sure to clean the print head to prevent the two inks from mixing and solidifying. in addition, if the quality of printing is decreased, such as strip stripes and color fading, the nozzle should also be cleaned.
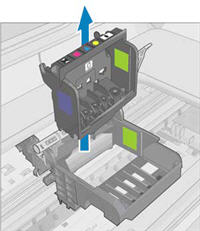
    If the software cleaning method fails, it proves that the blockage is more serious. which is usually caused by the printer being unused for a long time or the interruption of electricity during use, and the nozzle is not reset. with a syringe against the nozzle, constantly pulling the pressure device, the high-speed air stream is used to clean the nozzle ,and sucking out the remaining ink, which is an ink-saving cleaning method.
    If the first manual cleaning method does not work, it is now ready to open the printer. Turn off the power first, unplug it, and disconnect the power completely. Disassemble the moving shaft and rotate the belt, then carefully pick up the print head and rinse it with distilled water. A syringe and soft hose are then used to form an injection system that is inserted into the ink inlet for cleaning. Be extremely careful in both steps. Never let the water get on the board. If the board get wetted, should be blow drying with an electric blower immediately. Then reinstall it in the printer and execute the software cleaning program again to let the ink wash away the distilled water inside the nozzle.
  7. Avoid stress on the printer
    People sometimes place other objects on the printer, which may break the printer’s casing and some small things will fall into the printer. Of course, drinks and teacups are banned.
  8. Be sure to use the ink when it is loaded
    Because color toner cartridges are expensive, users are reluctant to use them, but they can also cause you a lot of trouble. Each time the nozzle sprays the ink, there is always the remaining ink left nearby, always using inkjet printer. The new ink in the cartridge will wash away the last remaining ink, otherwise they will slowly solidify, causing the nozzle to clog. Even if no ink was used, the machine will automatically clean the nozzles at regular intervals, which will result in greater waste.
    Regardless any kind of inks is out of ink, should change into a new cartridge as soon as possible. Some people think that black ink is not needed for color printing. In fact, the color ink is not pure black, and the printer will report an error and cannot print.
  9. Do not use multiple inks
    Because the ink chemical composition that each manufacturer is different, choose the same brand as far as possible and don’t change them frequently to avoid damage to the ink cartridges and print heads. the ink cartridge has a certain life span, and the number of ink refills is not unlimited. Usually, the safe method is to replace it within 10 times.
printing head

How to Clean and Maintain Inkjet Printers

Inkjet printers are more suitable for printing color pictures or photos, so they are more suitable for individual users. for individual users, the maintenance cost of inkjet printers should be as low as possible. If you can do simple daily maintenance at home, you can reduce the number of times send them to the service station, and you can reduce the daily expenses. Now, Asseel will show you how to maintain an inkjet printer in the spring.


The most important part of an inkjet printer, and the most vulnerable part is the nozzle. Inkjet printers mainly have micro-piezoelectric and thermal foaming technologies. Taking thermal foaming technology as an example, this technology firstly heats the ink and then through nozzle sprays it onto the printing paper to form an image. Therefore, keeping the print head unobstructed can make the inkjet printer work properly. Dry and windy sand in spring makes it easier to block the print head, so daily maintenance in this area is especially important.


Print head clogged of the inkjet printer is a serious problem, especially like the weather is dry in the spring, the printer head will be clogged after the printer has been out of use for some time. In order to solve this problem, inkjet printer manufacturers are also equipped with a boot automatic cleaning print head function on most products, and a button to clean the print head to ensure the normal operation of the printer. however, the automatic cleaning function is not always using good. If you encounter a serious blockage, you need to clean it manually. Below we also introduce several ways of manual cleaning.


Before cleaning, first determine the cause of the blockage. Some of them are caused by the viscosity of the ink on the print head becoming large, so you only need to manually remove the print head, and then wipe and clean the print head, you can solve it. however, if a non-original ink cartridge, or a non-genuine ink cartridge, because of the chemical coagulum in the ink or a large particle impurity, then the  simple cleaning cannot solve the problem.


Manually solve the nozzle clogging method:


1、Alcohol soaking

Prepare a 95% concentration alcohol solution and place it in a flat-bottomed container. The alcohol solution is limited to just cover the stainless steel edge of the printhead. The soaking time is usually between 2 hours and 4 days. The alcohol solution dissolves impurities in the ink and does not damage the print head. It also ensures high quality printing after cleaning. However, the disadvantage of this method is that it takes a long time and is cumbersome to operate.


2、Pressure cleaning method


Same as the solution used in alcohol soaking, but requires a clean cup, disposable syringe and disposable infusion set. By using the pressure generated by the siphon action of the syringe, the organic solvent of alcohol is injected into the print head to clean the dry head. the advantage of this method is that the cleaning effect is good and the time is short, which can solve the problem of lower serious blockage. but the determination is that the operation is more complicated and requires some skill.


3、Distilled water cleaning


If you encounter a more serious blockage, then use distilled water cleaning. Distilled water is cleaner and easier to handle congestion in small areas. The same operation method as the pressure cleaning method can solve the problem of congestion after repeated cleaning.


If the above three methods can not solve the problem of nozzle congestion, then you need to go to the repair station for repair, or replace the print head. But users don’t have to worry, as long as we do daily cleaning and maintenance, and buy genuine ink cartridges, we can solve the problem of nozzle blockage to the greatest extent.


print head

How to rescue Inkjet print head

Summary: All products of EPSON printer adopt the design method of separating the nozzle from the ink cartridge. The piezoelectric nozzle is used, and there is no heating process when inkjet is used, that is, “cold spray”.This equipment is very precise in design, especially the nozzle section. Moreover, EPSON’s ink is “quick-dry”, so long-term idle is easy to cause the nozzle of the print head to be plugged.


The general solution is to use the “clean” function in the driver, but this function is achieved by using ink to flush the nozzle, and the cost of the ink is high, so the waste is very serious. So we Asseel here to introduces a little trick to everyone.


Idea: There are two main reasons why the nozzle is plugged. One is that the printer is not used for a long time, the ink evaporates in the nozzle, and becomes a dry toner, which is stuffed in the nozzle. the other is that the filled ink is mixed with the original ink and neutralized due to the difference in colloidal charge, forming a precipitate to plug the nozzle, which is most likely to occur for black ink. If we don’t have ink in the nozzle when we don’t use it for a long time, and there is no ink in the printer before filling it, then will don’t have these problems.


Simple method to be implementation: First make a cleaning cartridge: Find some ink cartridges (See how many cartridges your printer USES at the same time) that are out of ink, pry it open, take out the foam inside, find a bubble of similar size (If can’t find the original one, you have to clean the newone), put it in the water with the empty cartridge and clean it. After cleaning, let the foam absorb enough pure water and put back the empty ink cartridge. Then, a cleaning cartridge is ready.


Easy use: Remove the existing ink cartridge from the printer, install the cleaning cartridge, and use the printer’s cleaning nozzle function to clean the printhead multiple times. You can also print a picture of all colors, and when you can’t see any color, then means nozzle being cleaned already.


With the method, we should apply the above method in a timely manner.The first is before you plan to not used it for a long time (or just before off duty every day), and before you plan to replace the ink cartridge or fill the ink.


Now Canon’s latest S-series printers also use this technology that separates the printhead from the ink cartridge. We can also follow this way to prevent the nozzle from being blocked. In addition, it is best not to use a method of refilling ink to save costs, and inferior ink can easily cause nozzle clogging.


If any inquiry about print head, ink cartridge or toner cartridge, pls contact:

Email:info@asseel.com

Whatsapp:008613266637838


printer head

Epson Printhead Leaner

1.Usage: Cleaned in two ways (Reference)

1). The cleaning solution is filled with liquid and filled into the printer cartridge

① Immersion cleaning of the cleaning head.

② When the print quality is degraded or the thread is broken when testing the mesh, install the ink cartridge containing the cleaning solution according to the normal method of replacing the ink cartridge.

③ Perform print head cleaning. After cleaning, perform the test mesh program until the mesh test is normal. For the color cleaning solution, the mesh test after cleaning can directly see the effect after cleaning. The cleaning effect of other cleaning solutions can be Install the ink cartridge for the mesh test.

④ After the mesh test is OK, remove the cleaning cartridge and seal the air duct and the outlet of the cleaning solution for reuse.

2).The cleaning liquid is installed in the container to clean the nozzle in the printing ink cartridge.

Using the step:

①  Take clean ware and pour a small amount of cleaning solution into it.

②  Remove the problematic nozzle and soak the nozzle. Do not allow the cleaning fluid to reach the nozzle plate and contact plate (Prevent short circuit or damage after being wetted by water).

③  The soaking time depends on the blocking time of the nozzle. If the nozzle is removed soon after it is blocked, it only needs to be soaked for 1-5 hours. If the nozzle is delayed for a long time, it can be soaked for 12-24 hour.


2.Precautions for cleaning:

  • The cleaning solution is completely compatible with the original ink and natural ink, and there is no damage to the print head and the ink refill tube.
  • After the cartridge is opened, if the cartridge is not replaced for the time being, you can replace it with a clean cartridge to protect the printing head.
  • The cleaning solution is not used in print heads whose internal structure has been damaged or has reached the end of their useful life.
  • The cleaning solution should avoid contact with the circuit of the nozzle when cleaning the nozzl
  • After the cleaning is completed, the nozzle circuit should be dry before installing the cleaning print head on the printer.
  • In the normal maintenance of the nozzle, when the printer is not working, a few drops of the cleaning solution can be used to reset the wet state of the sponge nozzle of the ink pad.
  • The cleaning solution has a certain volatility and should be kept sealed during storage and placed at a lower temperature.
  • If there is any splash of cleaning liquid into the eyes, etc., first rinse with clean water, then Wipe after rinsing. If the problem is serious, go to the hospital for examination.
  • The operating environment should be clean.
  • The circuit board is soaked, please treat it to clean, and then test it on the machine after drying, otherwise the circuit may burn down


printer head

HP Officejet 6500 E709c and Premier E709q Inkjet printer- Replace printhead assembly

Introduction:

The print head assembly includes ink cartridge and print head。If the existing printhead assembly is damaged or incompatible with the all-in-one, replace the printhead assembly with a new one.


Replace printhead assembly

Follow the steps below to replace the print head assembly.
Warning:A new print head assembly must be prepared before uninstalling the old cartridge.
Asseel recommends that the cartridge be placed outside the all-in-one for less than 30 minutes. Doing so may damage the all-in-one and ink cartridges.

Step one:Loading paper

1.Lift out the carton

printhead 1


2.Place a stack of paper on the right side of the box and print face down.

3.Adjust the width of the paper guide plate so that it sticks to the edge of the paper.

printhead 2


4.Close the output tray.

5.Pull out the extension of the output tray and unfold the paper stop at the end of the extension.

printhead 3

  1. Open the extension tray of the output tray
  2. Open the paper baffier


Step twoReplace printhead assembly

Follow the steps below to remove the old cartridge from the printhead.
WarningThe old ink cartridge can only be removed after preparing the spare printhead.

1.Open the cartridge door. The pen holder will move to the center of the all-in-one. Wait for the pen holder to stop before you can proceed to the next step.

printhead 4


2.Press the button on the front of the cartridge and pull it outwards, then pull the slot up

printhead 5


3.Repeat the above steps to remove all ink cartridges from the slot.

4.Lift the gray latch on the print head assembly

printhead 6


5.Remove the old printhead from the slot.

printhead 7

WarningDo not touch the copper contacts。 When installing the ink cartridge, do not let the contacts touch any surface or scratch the contacts.

6.Remove the printhead from the package.

printhead 8


7.Hold the printhead upright so that the side with the colored illustration faces up.

printhead 9


8.Place the print head in the unit so that the purple and green patches on the print head align with the purple and green patches on the all-in-one.

printhead 10


9.Slowly put down the gray latch.

printhead 11


10.With the ink cartridge contact point facing the printhead, slide the ink cartridge into the appropriate slot. Please refer to the color markings on the cartridge and in the printhead to avoid misplaced slots.

printhead12


11.Press down on the cartridge until it clicks into place.

printhead 13


12.Repeat the above steps to install all the ink cartridges, then close the cartridge door.

printhead

Asseel Graphics Company Tell You How to Perform Print Head Alignment (Windows)

“Print head Alignment”Will adjust ink tank position and improve related charts、Problems with incorrect position of lines and other items

  1. Turn on the printer.
    – For WindowsXP Home Edition
    Click/Select”Start”、”Control Panel”、”Printer and other Hardware”& “Printer and Fax”
    – For Windows XP Professional Edition
    Click “Start” and “Printer and Fax”
    – For Windows 2000/Me/98
    Click/Select “Start”and “Setup”, the select “Printer”
  2.  Right click on the printer icon and select “Attribute” from the displayed list.
  3.  Select the“Maintain”Tab, then click “Print Head Alignment”
    * Depending on the type of printer, the display will be different
  4. Place the paper thickness lever to the left and load an A4 or Letter size paper in the Auto Sheet Feeder.
    Click “Print head Alignment”
  5.  Printing will begin. View the displayed information and click “OK”.  Remark: Do not perform any other operation before printing
  6. Printing pattern
  7. If the pattern prints successfully, click “Yes” in the confirmation window. Remark: If the pattern is not printed or the result is significantly blurred, click “No” and restart printing from the beginning.
  8. Refer to the printed paper and enter the number in the “Print Head Alignment” window
    8-1. Select the pattern with the lowest number of visible vertical stripes in the column A area.
    8-2. Enter the pattern number of the selected pattern in the column A box shown on the right screen
    8-3. Similarly, enter the pattern number of the selected pattern in the Column B to Column L box
    An example of a high-visibility vertical stripe pattern.
    Low visibility vertical stripe pattern example.
    8-4. After entering all values, click “OK”
  9. “Print head alignment completed” message is displayed, click “OK.”

This completes the execution of “Print Head Alignment”.


If any questions about print head, pls contact:

Email:info@asseel.com

Whatsapp:008613266637838

print head

Development Trend of Inkjet Printing Technology and Additive Manufacturing

Today, a piece of paper and a flat-screen TV can all be put together to talk about manufacturing: they can all be “printed” using inkjet printheads. Inkjet printers were first invented by IBM in the 1970s as an alternative dot matrix printer. However, IBM researchers certainly did not expect that their invention would one day become a key element in the manufacture of televisions, electronic components and solar cells. About a decade ago, ink jet printers were gradually used to support the above-mentioned three applications in order to meet the requirements for the rapid and cost-effective manufacture of printed circuits and the efficient deposition of ultra-thin wires on solar cells.


Drop-on-demand piezoelectric printheads are best suited for the deposition of picoliter-scale inks on a time-, position-, and high-frequency basis. Compared to thermal ink-jet printing, which is widely used for consumer and office printing, piezoelectric printheads are widely used in industrial printing because of their better adaptability and longer lifespan in harsh environments. In addition, piezoelectric print heads can support more ink selections such as water, solvent, and UV curable types.


Inkjet printing as a manufacturing technology, after long-term research and development, in the field of display (smartphones, televisions, etc.) OLED thin film packaging, obtained the first large-scale manufacturing applications. OLED technology is driving the development of the display market. It not only brings market opportunities for inkjet printing, but it is also promoting inkjet printing technology as a popular new electronic and microelectronic manufacturing process. Kateeva is an American company dedicated to manufacturing inkjet printers for OLED displays and is one of the leading manufacturers of inkjet printing technology. After becoming the first company to achieve mass production of OLED thin film packages, Kateeva is now working hard to achieve RGB OLED material deposition for TV display manufacturing using inkjet printing. LG is currently using Kateeva’s printer for trial production.


The rise of the wearable market increasingly requires devices that are miniaturized and close to human skin, which brings market opportunities for flexible printed electronics. Inkjet printing technology will replace the expensive lithography process using mask technology to achieve the deposition of conductive lines on demand. Inkjet printing technology exhibits stable performance improvements in deposition accuracy, high resolution printing, and drop control. Inkjet printheads are one of the key components of inkjet printers and they are becoming more and more sophisticated, requiring deep technical and experience accumulation.


In order to increase the printing speed, inkjet printers generally integrate multiple inkjet heads in parallel. It is worth noting that inkjet head positioning and inkjet control are critical for target applications and printer manufacturers. The quality of inkjet printheads has been improved through the use of MEMS technology and thin-film PZT (lead zirconate titanate) materials, helping them meet the application needs of electronic products.


Can you create a complete electronic device using inkjet printing technology? The answer is yes, but it is limited to prototype printing applications. Now using an inkjet printer, using 3D inkjet printing can make almost all types of PCB boards. Nano-Dimension, a developer of 3D printing equipment solutions, launched the Dragongfly 2020 at the end of 2017. This product uses Konica Minolta’s inkjet print heads. In large-scale applications, inkjet printing is still one of the key processes in the manufacturing process.


2023 inkjet print head market will exceed $31 million

The use of inkjet printing technology for functional printing has created new market opportunities for inkjet printhead manufacturers. With the continuous advancement of the “Industry 4.0” digital revolution, the integrated inkjet printheads in industrial printing equipment are expected to grow to over US$31 million by 2023, with a compound annual growth rate of 30.3% over the 2017-2023 period. Major players in this field include Konica Minolta, Fujifilm DimaTIx, Océ-Canon and Xaar. The market outlook is promising, and other piezoelectric inkjet print head manufacturers are also very active now, which means that competition for market share will become increasingly fierce.


At present, R&D applications still account for a major share of the purchase volume of inkjet printers, accounting for approximately 93% of total shipments. The large-scale manufacturing applications of inkjet printing, OLED thin film packaging as a beginning, has just emerged. However, the market is now responding with optimism. The industry has shown great interest in RGB deposition, PCB and flexible electronic manufacturing inkjet printing applications.


Ink: Another Key Factor of Inkjet Printing Process


The key “golden triangle” in the inkjet printing process includes: inkjet print heads, inks, and substrates. There are a variety of ink materials available for ink jet printing, such as conductive inks, metallic inks, protective layer inks, and OLED material inks. Therefore, functional ink formulations are an important challenge for manufacturing applications. This report estimates the demand for ink for inkjet printing applications in the areas of functional manufacturing and additive manufacturing. Inkjet printheads have a limited viscosity for inks and indicate limited tension latitude and can only be optimized for certain types of inkjet printheads.

asseel pack for print head

How We Asseel Pack our Printhead?

As we know, for printhead is easy to have problem and make it not work, especially after long journey from China to our customer’s hand. In order to keep our Printhead work well in end-user hands’. We, Asseel, do a lot effort from collect them in market till packing, we do every step with 100% intentions!


Today, let me tell you how we Asseel pack our printhead.We have strictly rules to follow.


  1. After our engineer tested the printing head, they will run into our packing team. The first and most important thing is that our worker will put some protection fluid on the mirror of the printer head. That will protect our printing head from damaging it, and blocking it.
  2. Kindly pack them with box or transparent box
  3. Weight them one by one to keep the data accurately.
  4. Put them in carton with air bag or foam which will help pretending our Asseel Printhead from damage during the long trip.
  5. Glue the outside box and stock them in warehouse. Maybe you will ask why we glued the whole box? Well,that is a good question. Actually, it will increase our cost, but it can provide more protection for our printing head and then our end-user will get prefect goods.
  6. That is how we Asseel, packing our printhead. Hope it will help you know better of our package term.


Asseel Hot Selling Print heads:

print head for epson l800 print head for hp932 print head for hp920


More information about print heads, pls feel free to contact:

Email:info@asseel.com

Whatsapp:008613266637838

printing heads

How to clean the print head for HP Printer?

Print head and its carriage contacts may collect foreign matter that may cause continuity problems The procedure for cleaning the print head and its carriage is as follows:

1.Turn off the printer and turn it on
2.Allow the printer to complete initialization
3.Use the down arrow key to scroll to the ink menu (ink drop icon) and press OK
4.Scroll to Replace Printhead and press OK
5.Open the top cover
6.Open the cartridge cover and remove all printheads
7.Unplug the power cord from the back of the printer
8.Clean the electrical contacts on the carriage and the printing head with a lint-free cloth (such as a coffee filter or glasses-glass cleaning cloth), and if necessary, gently wet the cloth with water (do not use tap water that may contain contaminants, but distilled or bottled water) And place the head down on a piece of paper or paper towel with the nozzle facing up
9.Caution: Do not clean the print head nozzle plate as it may cause permanent damage to the printhead
10.When the contacts dry, reinstall the printhead and close the carriage cover – Do not remove the print head from the printer for more than 30 minutes
11.Close the lid
12.Plug in the power cord, turn on the printer and try verifying the function

If any inquiry about the print head, pls feel free to contact:

Whatsapp:008613266637838

Email:info@asseel.com


Portfolio Items