
Dismantling and Cleaning of EPSON Printer Heads
EPSON’s C4X (C41, C43, etc.) series of jets have a large number of users. If not used often, in the dry air, the print head’s ink is likely to dry up and even the nozzles are blocked. In the case of using the cleaning print head program operation processing is still invalid, we can only consider removing the print head for manual handling. At the present, Some articles on the violence dismantling of print head was circulated on the Internet, i think this method for ordinary users may have very serious consequences. Now, Asseel Graphics will tell the reader how to properly disassemble the printer head.
Preparation is replacement cartridges operation under the online state, when the print head is moved to the middle of the track, the power can be unplugged, the purpose is to get the print head out of the nozzle protection and the locking device.
Note: The following operation will automatically cancel the warranty. Please think twice and be careful.
Disassemble the printer and print head
First Step: Disassemble the Printer
- Preparation: Push the front paper holder into the body, remove the input tray, and glue the transparent cover with the white housing with the transparent tape, note that the seam only needs to be exposed. Do not tear it off as it will be used when restoring the printer.
- Open the inner buckle: At this point you will see two obvious internal buckle on the back of the printer. Use a small flat mouth screwdriver to push them open, and Then push one of the buckle between the two clips along the exposed gap, so that the back of the printer The clips are all uncovered. pay attention to keep exposed gaps for later operation
- Use the small flat mouth screwdriver to slide along the gap toward the front of the printer. You will encounter a total of four internal buckle cards on the left and right sides and the front of the printer, and open them in the same way. In this way, the printer cover and base are separated!
- Hold the movable paper card of the paper feed port and move it toward the left (facing the printer) until it is in the notch. At this point, lift the cover upwards to remove it easily.
Second step: Correctly disassemble the Print head
Remove the print head:After removing the upper cover of the printer, carefully observe the right side of the print head (facing the printer), you will find a clip, lightly hold the front of the print head with one hand, then with the other hand, gently pry the clip with a small flat screwdriver. At this time, it will feel that the right side of the print head front has move out a bit.
Will the print head connection cable, the cartridge monitoring chip cable (this type of cable must be clamped with a type of hemostatic forceps) from the socket, and slowly pull the print head connection cable out of the circuit board slot, At this time, you can also see the other clip on the left side of the print head under the white cable. Also use a small screwdriver to gently pry the clip. Then you can separate the front and rear positions of the print head by hand. And then the print head can be removed from the orbit.
However, we also need to remove the traction rack from the motor gear on the right side of the trolley: Put a small flat mouth screwdriver diagonally between the top of the gear and the rack. Move the rack to the right. The gear rack can be removed from the gear by turning the gear!
Split print head: After the print head is removed, the print head can be easily disassembled by grasping the front and rear print heads with both hands and applying force horizontally in the opposite direction.
Print head nozzle cleaning
- Preparation: The rear cartridge of the C4X series print head nozzle also includes the nozzle drive circuit board, so it is necessary to do a good job of protecting the drive circuit board and wrap the rear half of the bin with the usual cling film.
First step: Soak
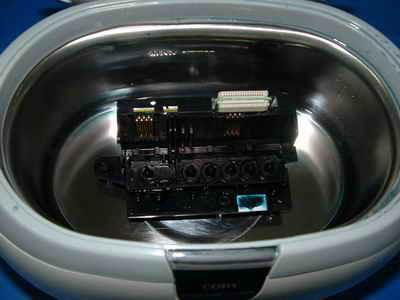
Prepare a small flat plate, place the nozzle flat on the plate, and inject distilled water into the plate to a depth just before the nozzle is partially submerged. Be careful not to splash water on the cable plug and the driver circuit board. The first soaking time is about one hour.
Second step: Nozzle injection flushing
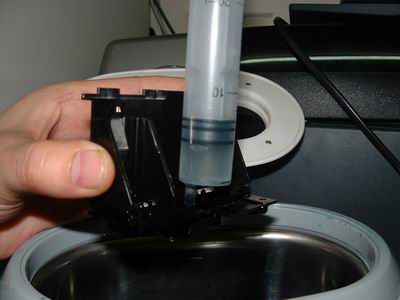
Use a plastic tube for a disposable infusion set, insert one end into a 5ml syringe, and insert the other end into the ink inlet hole of the nozzle that needs to be flushed. Push the distilled water in the syringe into the nozzle. Take care that the pressure is not too high to avoid water pressure squeeze broken sprinkler internal waterproof insulation adhesive. this process needs to be repeated several times until it is seen that every ink outlet hole is ejected with a fine water column. at this way, the clogged nozzle has been cleaned and dredged
Reloading printer
To properly install the cleaned printer head back into the printer, follow the steps below:
First, tear off the cling film, align the front and rear positions of the spray head horizontally, and use the bottoms guide column and guide rail to combine them, but don’t fasten the left and right clips securely. otherwise cannot be loaded on the word car track.
Next, insert the cable of the cartridge monitoring IC into the socket, and then mount the nozzle on the printer track. Use a small screwdriver to put the plastic rack on the gear of the word car motor, but be careful not to damage the rack or gear and pay attention to the rack and the relative position of the print head to avoid rework!
When this is done, push the nozzle holder inward, and you will hear “click, click”, indicating that the nozzle has been installed in place. push the print head right and left by hand. If move freely, it means the printer recovery finished. then plug the other end of the drive cable back into the socket of the driver circuit board. If the nozzle does not move freely, restart the operation. After the check is correct, carefully insert the cable of the nozzle back into the cable slot; finally, install the ink cartridge and turn on the power. And the upper cover of the printer is joined with the base, and glue the blue tape to restore the printer.
At this point, the correct disassembly and cleaning operations of the printer nozzles are completed.——Asseel Graphics company limited

